This post may contain affiliate links. Please read our disclosure policy.
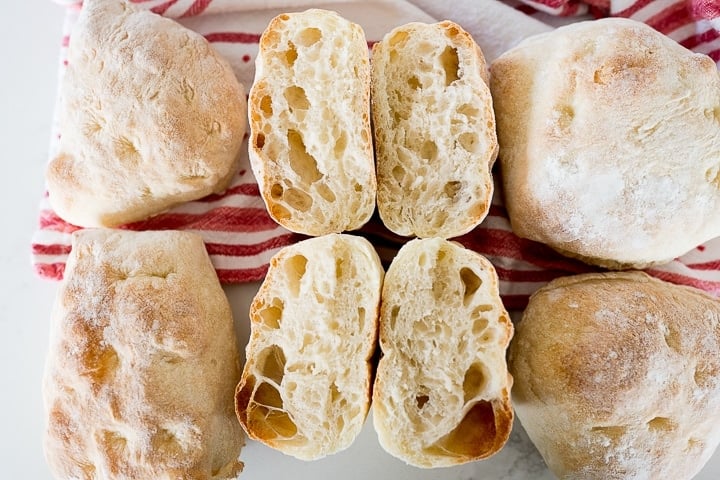
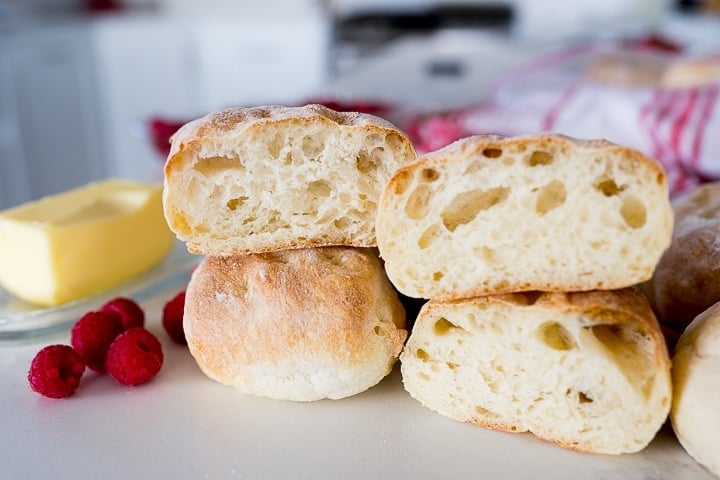
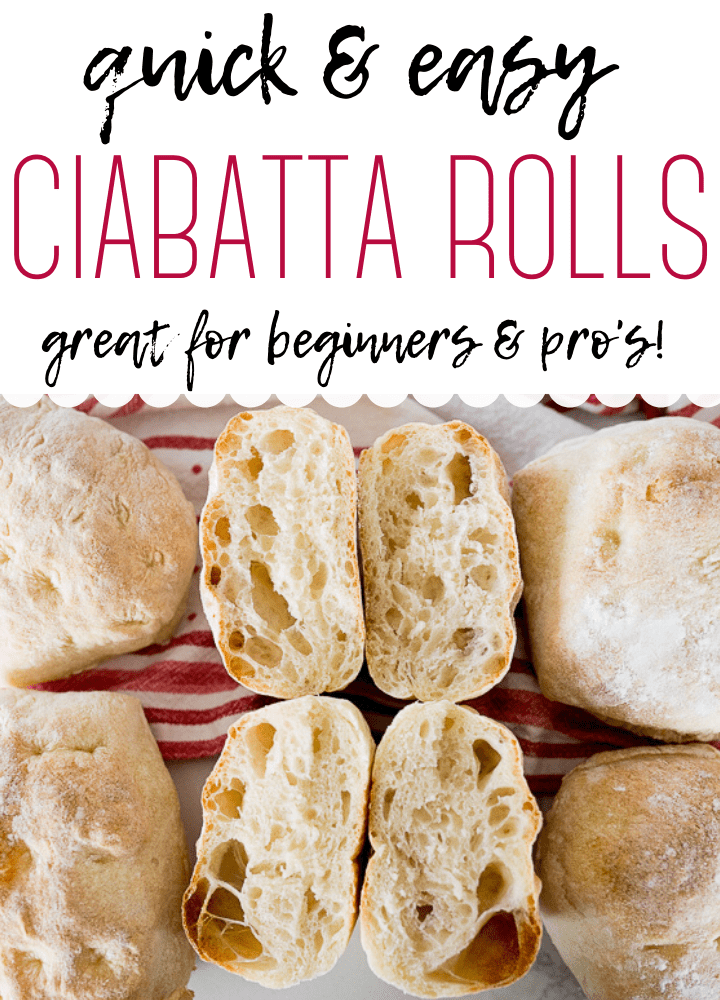
Ciabatta Rolls are a combination of a crispy crust and a chewy crumb that is airy, filled with holes! This version can be made in a few hours instead of over the course of a day or two.
Ciabatta
Ciabatta (pronounced cha-bah-tuh) is an Italian white bread that is known for it’s gorgeous holes inside. The bread, or in this case rolls, have a rustic feel which means they don’t ever look perfect, which means no matter what they look like, they are perfect.
The dough is also really unique. Made up of only the simplest ingredients the final dough is WET. Wet, but totally manageable. Honestly, this may be my favorite dough to work with.
Back in the day, this bread was made my slapping the wet dough onto the counter instead of kneading. Luckily we can use a higher speed on our stand mixer to do this easily for us. If you don’t have a stand mixer personally, borrow one from a friend because that is one tool you’ll definitely need to make this recipe.

Ciabatta Roll
You can make Ciabatta Bread, in a loaf, or you can make ROLLS, which is what we are talking all about today. After many, many batches and tweaks, I’d like to report that I have made better Ciabatta rolls than I can get at Sam’s Club.. and Sam’s Club is 30 minutes away! So by the time I drive there, spend way too much money inside and then drive home, I could have made them from scratch. Boom-shaka-laka. 😉
My absolute favorite thing to pair with my Ciabatta Rolls is shredded beef to make delicious French Dip Sandwiches. This bread is perfect for soaking up all of those drippings!
Ingredients in Ciabatta Rolls
- Water: We will need warm water for this recipe, looking for anywhere around 100°.
- Yeast: Active Dry or Instant Yeast will work well for this recipe. We will use a total of 1 3/4 tsp.
- Flour: No fancy flour needed, all we will use is All-Purpose Flour.
- Salt: There is 2 whole teaspoons of salt in this recipe, this does not make the bread salty by any means, it enhances the natural flavor of the bread.
How to make Ciabatta Dough
Ciabatta dough is comprised of 2 parts. The Biga (think of it like a starter) and then the ciabatta dough. The Biga is classically mixed together and then sits, bubbles and ferments overnight prior to baking the bread or rolls.
The Biga
Don’t worry, we won’t be waiting. I have a cheat for that! The Instant Pot Yogurt Button. (cue the hallelujah chorus.) The Biga is a combination of water, yeast and flour. The Biga will sit and ferment quickly using the yogurt (less) button in 45 minutes! When it is done it will be warm, and have a lot of bubbles in it. (see photo below) Psst. If you don’t have an Instant Pot, you can do the same in a warm oven!
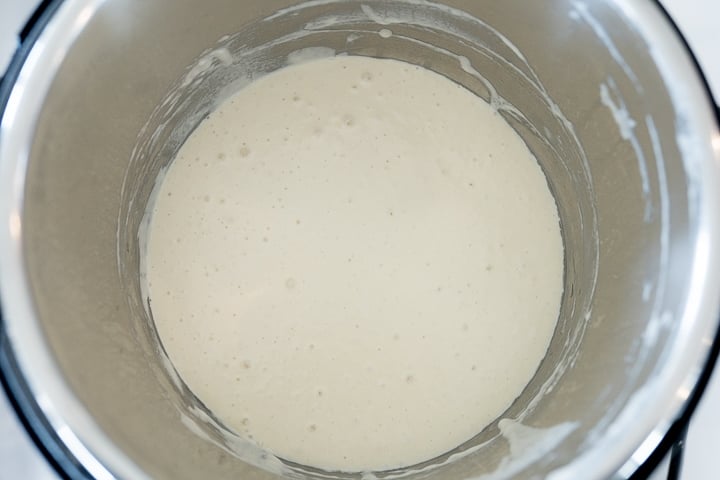
The Biga is what gives the roll it’s flavor, chewy crust and crumb, so definitely don’t skip this!!
The Biga is now mixed together with more water, yeast, flour and salt in a stand mixer. I use a Kitchenaid Mixer. Mix everything together slowly using the dough hook until all of the flour is combined. Then kick the speed up on your stand mixer until it is about medium high, in between the 4 and 6 on your Kitchenaid. Now, walk away (but keep and eye on it, it is going to get a little crazy!) for a good 10 minutes. (pro tip, just put the mixer on the floor so it doesn’t fall off of the counter. 🙂 )
The dough is very wet. You are going to think you’ve done something wrong but hold tight!! At about the 10 minute mark, something magical will happen. The dough will pull away from the bowl and gather around the hook. You will hear regular slapping of the dough against the sides of the bowl. Allow the dough to knead like this for an additional 5 minutes after it gathers to the hook.
If your dough isn’t gathering around the hook, add in a little extra flour 1 tbsp at a time until it gathers around the hook.
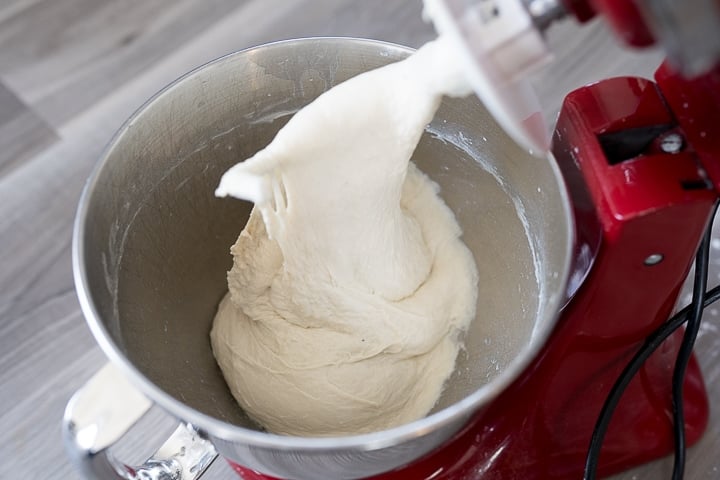
As soon as you stop the mixer, the dough will slow motion puddle at the bottom of the bowl, that is exactly what you want to see. It will be very smooth and shiny.
Rising the dough
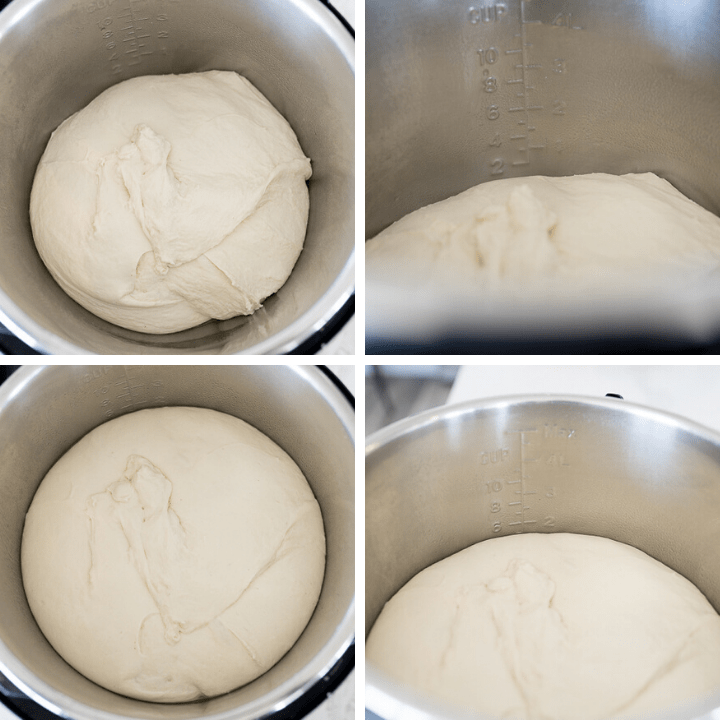
Now, let’s let this dough rise until triple! You can do this on the counter in about 2-3 hours time or we can do it in 30 minutes using our (well greased!) Instant Pot on the yogurt normal setting. (The Instant Pot yogurt button makes me geek out. I love it so much.) The top row of photos below is right when I put it into the Instant Pot, the bottom is 30 minutes later. Look at the measurement on the side of the pot!! Again, you can do this in a warm oven if you don’t have an Instant Pot. Details in the recipe card below.
From here, generously flour your counter top and gently roll the dough out of your Instant Pot/ rising bowl. Be careful not to squash all of those precious air bubbles!!
Shaping/ Cutting and Baking Ciabatta Rolls
Gently shape into a long rectangle. We will now cut the rectangle into 12 rolls using a pizza cutter. Don’t be shy with the flour, but be very gentle! Don’t destroy the bubs. 😉
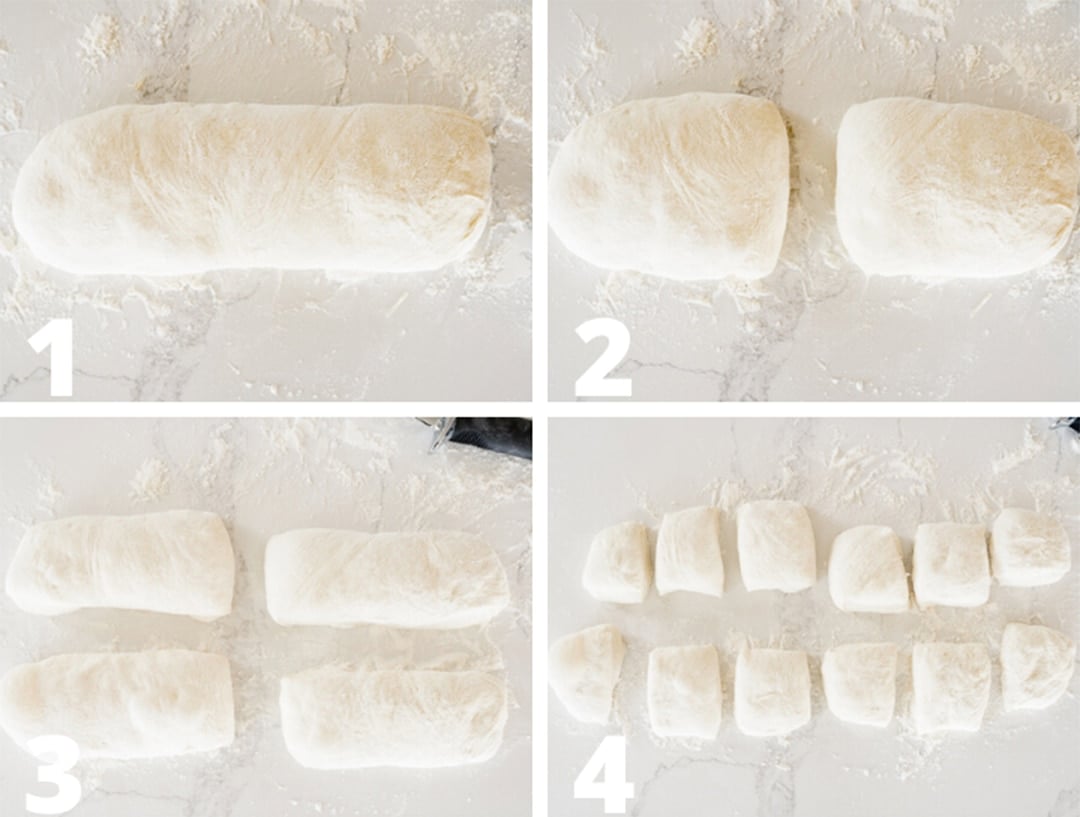
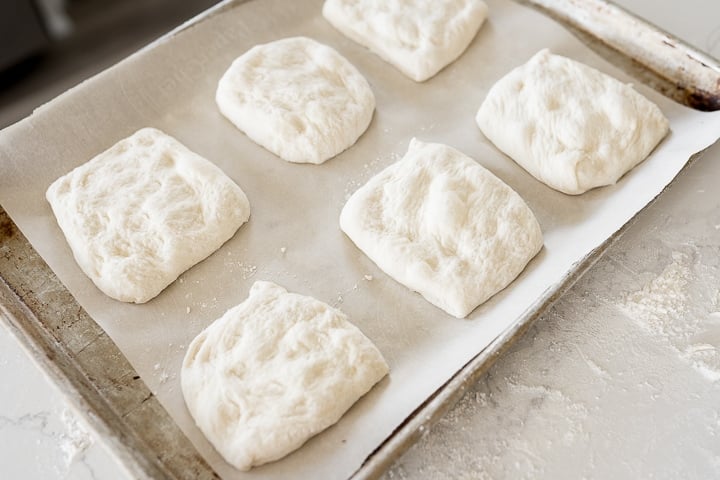
Arrange your rolls onto a parchment paper lined cookie sheet. Gently use your fingers to press down, flatten and shape the rolls into squares if they got a little out of shape while cutting. Again, be carful not to ruin all of the air bubbles! Gently!! The rolls will puff up quite a bit while baking.
Allow the rolls to rest while the oven preheats to 450°. Once the oven is heated, bake for 15-20 minutes or until the rolls are golden brown.
For the best texture and crumb, allow them to cool completely before using with a sandwich.
How to Store Ciabatta Rolls
Store in an airtight container for up to 2 days. They are best the day of, though. If you want to extend the life even longer, as soon as they are cool pop them into a freezer zip top bag and freeze until you are ready to use them.
What to eat with Ciabatta Rolls
I like to use them with French Dip Sandwiches, breakfast sandwiches, lunch panini’s, garlic bread or as a side to soup or stew.
More Must Try Bread Recipes
If you loved what you saw here, get more of it on Facebook, Instagram & Pinterest! I’d love to connect! Sign up for my weekly newsletter below to never miss a new recipe again!
[et_bloom_inline optin_id=”optin_2″]


Ciabatta Rolls Recipe
Ingredients
Biga
- 3/4 cup warm water
- 3/4 tsp active dry or instant yeast
- 1 cup all purpose flour
Ciabatta Dough
- biga
- 2 cups warm water
- 1 tsp active dry or instant yeast
- 4 cups all purpose flour
- 2 tsp salt

Instructions
Biga
- In the Instant Pot liner*, stir together the ingredients of the Biga. Stir vigorously for 30 seconds to 1 minute.
- Turn on the Instant Pot to Yogurt LOW, cover with a lid and let the Biga sit for 45 minutes. The Biga should be warm and bubbly at the end of the 45 minutes.
Ciabatta Dough
- In the bowl of a stand mixer, add the water, yeast and biga. Stir with a silicon spoon to break up the Biga.
- Add the flour and salt to the bowl, and knead using the dough hook. Start slowly until all of the flour is incorporated. Once all of the flour has been incorporated, bump the speed up to 4-6. The dough will be sticky and thin. At about the 10 minute mark, the dough should hold onto the hook and not stick to the sides of the bowl.
- Continue mixing for an additional 5 minutes after the dough holds onto the dough hook. The dough will be very smooth and have a shiny appearance. When the mixer stops, the dough will fall down to the bottom of the bowl.
- Clean out the Instant Pot liner and then spray with non stick spray. Place the dough into a well greased Instant Pot. Place a lid on top. Allow the dough to rise on Yogurt NORMAL* for 30 minutes.
- Carefully pour the dough out of the Instant Pot and onto a floured counter top.
- Shape the dough into a long rectangle and use a pizza cutter to cut the dough into 12 equal pieces.
- se your fingers to dimple and shape the rolls into a square.Allow the rolls to rest while the oven preheats to 450° and bake for 20 minutes.
- use your fingers to dimple and shape the rolls into a square.
- Allow the rolls to rest while the oven preheats to 450°.
- Bake for 15-20 mintues or until the rolls are golden brown.
- For best results, allow the rolls to cool prior to cutting and using for sandwiches.


I am having trouble getting the dough to stick to the blade of the mixer. You mentioned that would magically happen at around the 10 minute mark. Well, I went to 20 and 25 minutes and it still would not happen. My water was 2 cups and 4 cups flour. I did add an extra 1/4 cup flour just to make it stick, but not totally. I find that adding too much flour make the rolls very dense and not light and airy like yours. I am doing them again for a second time, it did the same and I’m proofing a second time right now.
All in all these are very easy and good! HELP!
Corinne
Hi Corinne, Try bumping the speed up just the tiniest bit, that should help your dough stick to your dough hook!! I am so glad that you found the recipe easy and good. 🙂 And depending on your humidity, you may need to add a little extra flour.
I tried adding the extra flour this time, my previous attempts were quite runny (but still delicious) do you brush with egg wash to get them brown? Mine look anemic…
I don’t brush with an egg wash, but you could definitely do that!!
I tried these today, and they did not turn out for me. I can’t really figure out what I did wrong. The only thing I can figure out is that I didn’t put a lid on my instant pot when I put the Biga in there. I read and read the instructions again, and I don’t see that, but I noticed someone mentioned it in the comments! So, maybe that had an effect on them. But the dough seemed to look just like yours, even down to the point of shaping and baking, but as soon as I took them out of the oven, I saw that they looked undercooked on the sides. I put them back in the oven and baked them another five minutes (which put me at 20 minutes), and they were still doughy looking. So, I put them back in the oven yet again for another 3 minutes (at 450). So, they were definitely done but had a doughy texture. I threw them away and threw some breadsticks on to go with our Instant Pot Low Country Boil.
Hi Tammy- So sorry to hear that these didn’t work out for you this time.
No need to apologize. I promise I am not complaining. Your other recipes I’ve tried were fabulous, and this one is probably no different. It had to be me! I just don’t know what I did wrong. Maybe someone will see this and give me some insight. Thanks for your reply.
Thank you for your reply. I did bump us the speed a bit and it did make a little difference. But I am afraid that I may have ruined the batter from overworking the dough. I have 2 kitchen aid machines a Smaller one Artisian and a profession size, and I even trasfered from the pro size to the smaller size and that’s when it came together. Can you over knead the dough and if so how much time is overkneadng? I also baked them in an oven with my cast iron filled with water. WOW, that makes a big difference too. I am a beginner bread maker and I am determined to master this. I’d like to start a sour dough starter and make Sourdough Bread too. Do you have that recipe? Thank you so much for taking the time to answer my questions.
They baked up much lighter than the first, still not a lot of big air bubbles. BUT GOOD!
I don’t have a sourdough recipe.. yet. 😉 Keep baking these, you will master them!! I haven’t experienced over kneading this dough with all of my test runs so as long as you just keep kneading for about 5 minutes after it pulls to the hook, you should be golden! 🙂
You are baking 6 rolls at a time. Wondering if the remaining 6 can wait without getting too fat while the 1st six are baking?
Hi Sue- I bake mine using the convection function on my oven. If your oven doesn’t have a convection function, I would try to fit as many rolls as you can on one pan and then maybe use a smaller pan for the rest of the rolls so they can bake at the same time. If you need to do them in 2 batches, the second batch will just be a little bigger. 🙂
I don’t have a yogurt button, since I have the IP Duo Crisp. It has a sous vide button, which I have read can be used for making yogurt. Would that work for this?
Hi Kristin- I haven’t tested that out so I am not sure. I would use a warm oven instead to be safe.
It looks like you updated this recipe recently. Is there anyway to access the old post? I have made this and loved it in the past but the ciabatta rolls didn’t turn out today with the updated recipe.
Hi Val, I did update the recipe to yield a classic Ciabatta Roll per the feedback from a lot of readers disappointed with the original recipe. Email me at karli@cookingwithkarli.com and I can send you the original.
Has this recipe changed? I do not remember having to make a starter first? And my family has requested them with burgers today…..I remember mixing everything in the instant pot.
Hi Jennifer, I did update the recipe to yield a classic Ciabatta Roll per the feedback from a lot of readers disappointed with the original recipe. Email me at karli@cookingwithkarli.com and I can send you the original.
Made these for my daughter a few weeks ago. She loved them! I’m wondering if you can put in add ins (like rosemary or basil) and if so, when should you add it?
Yes! That would be delicious! I would put it in during the last minute or two of kneading the dough!
Awesome recipe! I impressed the whole family =D
Thanks Karli!
You go Jes, good job! So glad it worked out, keep up the good work.
After I already baked them, I read through the comments and saw something about having water in the oven while they bake? Did I miss that in the instructions? Mine didn’t really brown much.
No, that isn’t in the recipe. You did it right! You’ll just bake them longer to brown them a bit more. The timing will depend upon your specific oven.