This post may contain affiliate links. Please read our disclosure policy.
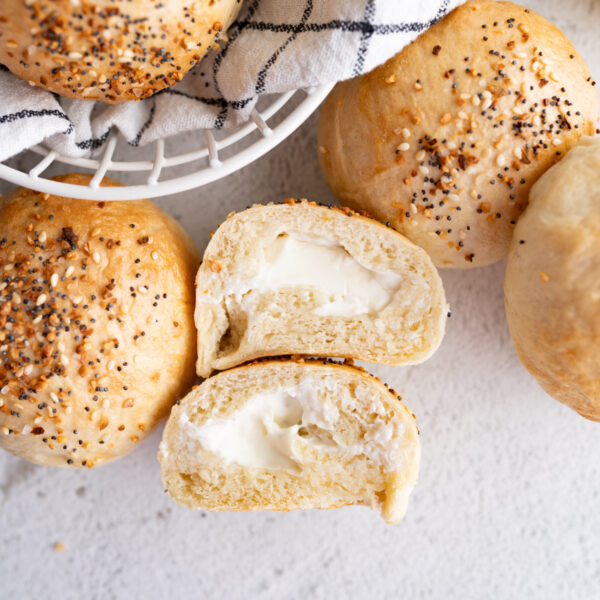
These homemade bagels are my cheesiest yet! With cheddar cheese in the dough and melted on top, you chedda believe you’re going to love it.

You’ll Love These Homemade Cheddar Bagels!
A couple of months ago I bought an expensive cheddar bagel from a local shop, sliced it in half and was so disappointed when I bit into the bottom side – there was absolutely zero cheese flavor. I decided then and there that when I made a cheddar bagel for my weekly bagel series, it wouldn’t rely on a few sprinkles of cheese on top to season it. This cheddar bagel includes a whole cup of cheese in the dough, ensuring you get delicious cheesy flavor in every single bite! But don’t worry, it doesn’t taste stringy or gummy, it just adds a wonderful cheddary BAM so you can have your cheese bagel and actually taste it in the bottom half, too.

What You’ll Need to Make Cheddar Bagels at Home
- Warm water (105° F- 113° F) – You’ll want this water to be warm, but not too hot! This will foster perfect yeast growth.
- Dry active yeast
- Brown sugar
- Bread flour – Using bread flour is a MUST! It makes the bagels so tender and soft.
- Salt – I personally like to use Redmond Real Sea Salt, but you can use whatever salt you’d like.
- Shredded sharp cheddar cheese, divided – I think sharp cheddar cheese is the way to go here! But if you want to use something milder, go ahead.

How to Make Cheddar Bagels
- In a small bowl, add the warm water, dry active yeast and brown sugar. Stir to combine and set aside.
- In a large bowl or in the bowl of a stand mixer, add the 4 1/2 cups of bread flour, salt and 1 cup of the shredded sharp cheddar cheese. Mix to combine.
- At this point, your yeast mixture should be bubbly and foamy. Add the active yeast mixture to the dry ingredients.
- If using a stand mixer, use the dough hook and knead for 10 minutes, you will most likely need to add in a bit of extra flour to keep the dough workable but soft.
- If mixing by hand, start by stirring the dry ingredients into the yeast mixture until a shaggy dough forms. At this point, pour the contents onto a clean surface and knead by hand for 10 minutes. Add the extra 2-3 tbsp of bread flour as needed to keep the dough soft but workable. Knead by pushing the dough, turning and folding it in half. Repeating this for 10 minutes.
- Once the dough has finished kneading, allow the dough to rest for 5 minutes.
Shaping & Baking Cheddar Bagels
- Use a sharp knife or bench scraper to cut the dough into 8 equal sized pieces. (Cut the dough in half, then each half in half again and then once more)
- Take each portion of dough and knead into a tight ball. Once in a ball, press your thumb into the center of the ball and gently squeeze and pull the dough while rotating it around your thumb to create the bagel shape. Place onto a parchment or silicone lined 3/4 cookie sheet (this is just a larger cookie sheet).
- Repeat with the remaining dough.
- Cover the cookie sheet with plastic wrap and allow the bagels to rise for 20-30 minutes.
- Preheat the oven to 425°F once the bagels have risen.
- In a large pot, boil about 4 inches of water. Once the water is at a rolling boil, carefully drop the risen bagels into the boiling water one by one. You may have to do this in a few batches. Boil the bagels for about 1 minute, flip over to the other side and boil for an additional minute.
- Using a large slotted spoon or spider strainer, remove the bagels and return to the lined cookie sheet.
- Repeat with the remaining bagels. While the next batch of bagels are boiling, top the boiled ones with shredded cheese.
- Once all of the bagels have boiled and are topped with shredded cheese, bake in the 425° F oven for 15-17 minutes or until golden brown.
- Allow the bagels to cool for 10 minutes before cutting and enjoying.
- Store in a zip top bag in the fridge for up to 4 days. Enjoy!

How should I store my homemade bagels?
Once your bagels have cooled, store in an airtight container or a zip top bag in the fridge for up to 4 days.
Can I freeze cheddar bagels?
Yes, you absolutely can! Let your bagels cool completely and then place in a freezer-proof bag. Freeze and use within 3 months.

Cheesy Bagels to Devour


Cheddar Bagel Recipe
Ingredients
- 2 cups warm water (105° F- 113° F)
- 1 1/2 tbsp dry active yeast
- 1 tbsp brown sugar
- 4 1/2 cups bread flour
- 2 tsp salt
- 2 1/2 cups shredded sharp cheddar cheese, divided

Instructions
- In a small bowl, add the warm water, dry active yeast and brown sugar. Stir to combine and set aside.
- In a large bowl or in the bowl of a stand mixer, add the 4 1/2 cups of bread flour, salt and 1 cup of the shredded sharp cheddar cheese. Mix to combine.
- At this point, your yeast mixture should be bubbly and foamy. Add the active yeast mixture to the dry ingredients.
- If using a stand mixer, use the dough hook and knead for 10 minutes, you will most likely need to add in a bit of extra flour to keep the dough workable but soft.
- If mixing by hand, start by stirring the dry ingredients into the yeast mixture until a shaggy dough forms. At this point, pour the contents onto a clean surface and knead by hand for 10 minutes. Add the extra 2-3 tbsp of bread flour as needed to keep the dough soft but workable. Knead by pushing the dough, turning and folding it in half. Repeating this for 10 minutes.
- Once the dough has finished kneading, allow the dough to rest for 5 minutes.
- Use a sharp knife or bench scraper to cut the dough into 8 equal sized pieces. (Cut the dough in half, then each half in half again and then once more)
- Take each portion of dough and knead into a tight ball. Once in a ball, press your thumb into the center of the ball and gently squeeze and pull the dough while rotating it around your thumb to create the bagel shape. Place onto a parchment or silicone lined 3/4 cookie sheet (this is just a larger cookie sheet).
- Repeat with the remaining dough.
- Cover the cookie sheet with plastic wrap and allow the bagels to rise for 20-30 minutes.
- Preheat the oven to 425°F once the bagels have risen.
- In a large pot, boil about 4 inches of water. Once the water is at a rolling boil, carefully drop the risen bagels into the boiling water one by one. You may have to do this in a few batches. Boil the bagels for about 1 minute, flip over to the other side and boil for an additional minute.
- Using a large slotted spoon or spider strainer, remove the bagels and return to the lined cookie sheet.
- Repeat with the remaining bagels. While the next batch of bagels are boiling, top the boiled ones with shredded cheese.
- Once all of the bagels have boiled and are topped with shredded cheese, bake in the 425° F oven for 15-17 minutes or until golden brown.
- Allow the bagels to cool for 10 minutes before cutting and enjoying.
- Store in a zip top bag in the fridge for up to 4 days. Enjoy!


Watching the video made all the difference. These were easy to make and so yummy!
Amazing!!! These are so good! And they’re huge!
I just made your cheddar bagels, they are so yummy! Who needs an expensive bagel shop. This was my first attempt at making bagels, this recipe was very easy to follow, I will definitely make these again.
Nailed it! This was by far the easiest and best tasting recipe I’ve tried. I was even able to spice it up with a ¾ cup of dried mild jalapeños from a jar. I just spread them evenly on a baking sheet, set oven to 350°F, and took them out after 20 minutes and chopped them up. Absolutely wonderful. Thank you.
I made these today for the first time, and they were SO GOOD. My family unanimously agrees, which really doesn’t happen. I figured they would be great like everything else on the site, but I’ll definitely be making them again.
This. Is. Amazing.
I made these bagels on a whim this morning for my wife, and she absolutely DEVOURED them! She’s heavily pregnant and has some food aversion, but these?!?! She ATE!!!
They’re soft, they’re perfectly salted, and they baked so nicely!!
Thank you so much for sharing this recipe! I will 100% be making these again
You are an absolute godsend for sharing this, thank you, thank you, thank you
Just made these this morning and my son loved them says best bagel he ever had!
Amazing! Large, soft and chewy. Makes a fantastic breakfast sandwich. I used white sharp cheddar that browned perfectly..Next time I will divide into 10 bagels instead of 8 – personal preference. Family is already asking for another batch 🙂
This was the first time I made bagels and this was an easy recipe. The taste was good but they were heavy. I’m not sure if I did something wrong or not.
These turned out HUGE. Basically a loaf of bread size each haha. I would make again but cut into 16 instead of 8!
They were also a little flat. I wonder if proofing the dough before shaping and then again after shaping would make a difference 🤔Otherwise an easy to follow recipe and tasty, thanks!!