This post may contain affiliate links. Please read our disclosure policy.
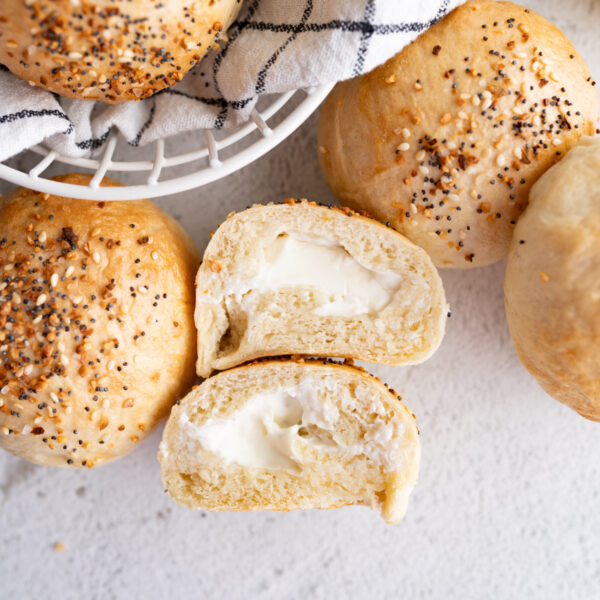
These Cheddar Herb Bagels are like a regular cheese bagel, just with a college education. The qualifications: cheese as a garnish AND dispersed inside the tender bagel alongside delicious herby speckles.

Fan Favorite Cheddar Bagels
If you haven’t noticed by now, I’m a big fan of cheese bagels. From Garlic Parmesan Bagels to Cheddar Bacon Everything Bagels to Swiss Cheese Bagels, I seriously cannot get enough. But of all the cheese bagel recipes I’ve developed, these Cheddar Herb Bagels are definitely a fan favorite. There’s a lot to love about these guys, but I’m particularly fond of the slightly crisp cheese topping on the chewy exterior and the soft middle that’s enhanced by the combination of flavorful herbs and sharp cheddar. All in all, they’re exactly what I want and need a cheese bagel to be.

Ingredients Needed for this Cheese Bagel Recipe
- Warm water (105° F- 113° F) – Yes, the temperature of your water actually does matter. Too hot or too cold and your yeast (& bagels) will not rise properly.
- Dry active yeast – Use dry active or instant yeast.
- Brown sugar – This replaces a popular (yet inaccessible) bagel ingredient, barley malt.
- Bread flour – A fluffy, soft, tender bagel must.
- Salt
- Oregano
- Garlic
- Parsley
- Shredded sharp cheddar cheese – You can use a different cheese, as desired.

How to Make Herby Cheddar Bagels
- In a small bowl, add the warm water, dry active yeast and brown sugar. Stir to combine and set aside.
- In a large bowl or in the bowl of a stand mixer, add the 4 1/2 cups of bread flour, salt, oregano, garlic, parsley and 1 cup of the shredded sharp cheddar cheese. Stir to combine.
- After a few minutes, your yeast mixture should be bubbly and foamy. Add the yeast mixture to the dry ingredients.
- If using a stand mixer, use the dough hook and knead for 10 minutes, you will most likely need to add in a bit of extra flour to keep the dough workable but soft.
- If mixing by hand, start by stirring the dry ingredients into the yeast mixture until a shaggy dough forms. At this point, pour the contents onto a clean surface and knead by hand for 10 minutes. Add the extra 2-3 tbsp of bread flour as needed to keep the dough soft but workable. Knead by pushing the dough, turning and folding it in half. Repeating this for 10 minutes.
- Once the dough has finished kneading, allow it to rest for 5 minutes.
Shape & Bake Bagels
- Use a sharp knife or bench scraper to cut the dough into 8 equal sized pieces. (Cut the dough in half, then each half in half again and then once more).
- Take each portion of dough and knead into a tight ball. Once in a ball, press your thumb into the center of the ball and gently squeeze and pull the dough while rotating it around your thumb to create the bagel shape. Place onto a parchment or silicone lined 3/4 cookie sheet (this is just a larger cookie sheet).
- Repeat with the remaining dough.
- Cover the cookie sheet with plastic wrap and allow the bagels to rise for 20-30 minutes.
- Preheat the oven to 425°F once the bagels have risen.
- In a large pot, boil about 4 inches of water. Once the water is at a rolling boil, carefully drop the risen bagels into the boiling water one by one. You may have to do this in a few batches. Boil the bagels for about 1 minute, flip over to the other side and boil for an additional minute.
- Using a large slotted spoon or spider strainer to remove the boiled bagels and return to the lined cookie sheet.
- Repeat with the remaining bagels. While the next batch of bagels are boiling, top the boiled ones with shredded cheese.
- Once all of the bagels have boiled and are topped with shredded cheese, bake in the 425° F oven for 15-17 minutes or until golden brown.
- Allow the bagels to cool for 10 minutes before cutting and enjoying.
- Store in a zip top bag in the fridge for up to 4 days. Enjoy!

Can I use a different cheese in this bagel recipe?
For sure! I used sharp cheddar to ensure the flavor really pops, but you can use whatever cheese you’d like. An herby parmesan bagel would be really nice, too.
How do I store homemade cheddar bagels?
Once your bagels have cooled, store in a ziptop bag in the refrigerator for up to 4 days.
Do I need special tools to make homemade bagels?
Need? No. You can make these with items you likely already have in your kitchen. But there are a few things that make baking bagels easier.
- I recommend grabbing an extra large cookie sheet + silicone mat so you can bake all of your bagels at once.
- This spider strainer is also SUPER NICE for boiling your bagels. A slotted spoon will get the job done, but this spider will allow the water to drip off of the bagels a lot quicker.

Sweet, Sweet Bagels to Try


Cheddar Herb Bagels
Ingredients
- 2 cups warm water (105° F- 113° F)
- 1 1/2 tbsp dry active yeast
- 1 tbsp brown sugar
- 4 1/2 cups bread flour
- 2 tsp salt
- 1 tsp oregano
- 2 tsp garlic
- 1 tsp parsley
- 2 1/2 cups shredded sharp cheddar cheese, divided

Instructions
- In a small bowl, add the warm water, dry active yeast and brown sugar. Stir to combine and set aside.
- In a large bowl or in the bowl of a stand mixer, add the 4 1/2 cups of bread flour, salt, oregano, garlic, parsley and 1 cup of the shredded sharp cheddar cheese. Stir to combine.
- After a few minutes, your yeast mixture should be bubbly and foamy. Add the yeast mixture to the dry ingredients.
- If using a stand mixer, use the dough hook and knead for 10 minutes, you will most likely need to add in a bit of extra flour to keep the dough workable but soft.
- If mixing by hand, start by stirring the dry ingredients into the yeast mixture until a shaggy dough forms. At this point, pour the contents onto a clean surface and knead by hand for 10 minutes. Add the extra 2-3 tbsp of bread flour as needed to keep the dough soft but workable. Knead by pushing the dough, turning and folding it in half. Repeating this for 10 minutes.
- Once the dough has finished kneading, allow it to rest for 5 minutes.
- Use a sharp knife or bench scraper to cut the dough into 8 equal sized pieces. (Cut the dough in half, then each half in half again and then once more).
- Take each portion of dough and knead into a tight ball. Once in a ball, press your thumb into the center of the ball and gently squeeze and pull the dough while rotating it around your thumb to create the bagel shape. Place onto a parchment or silicone lined 3/4 cookie sheet (this is just a larger cookie sheet).
- Repeat with the remaining dough.
- Cover the cookie sheet with plastic wrap and allow the bagels to rise for 20-30 minutes.
- Preheat the oven to 425°F once the bagels have risen.
- In a large pot, boil about 4 inches of water. Once the water is at a rolling boil, carefully drop the risen bagels into the boiling water one by one. You may have to do this in a few batches. Boil the bagels for about 1 minute, flip over to the other side and boil for an additional minute.
- Using a large slotted spoon or spider strainer to remove the boiled bagels and return to the lined cookie sheet.
- Repeat with the remaining bagels. While the next batch of bagels are boiling, top the boiled ones with shredded cheese.
- Once all of the bagels have boiled and are topped with shredded cheese, bake in the 425° F oven for 15-17 minutes or until golden brown.
- Allow the bagels to cool for 10 minutes before cutting and enjoying.
- Store in a zip top bag in the fridge for up to 4 days. Enjoy!


These are incredible!! They have been a huge hit with my coworkers!
I’m wondering though, how come mine come out so big?
Yay! So glad you like them. You can always divide the dough into more portions to create smaller bagels.
My family loved them, they were so easy to make and super delicious!
these were ammazzzingggg, steps were easy to follow and it made the most delicious, fluffiest, filling bagels i’ve ever had!!!!!